Installing a wired doorbell takes a little more effort and time than installing a wireless doorbell, but it is worth the effort to have a reliable, feature-rich doorbell which can be hooked up to multiple doors if necessary.
Wired doorbells have a button, a chime unit and a transformer. If you already have some doorbell wiring in place because you’re upgrading from an existing wired doorbell, then installing a new doorbell should be a fairly easy job. If you need to install the wiring from scratch, then it becomes a more complicated task. If you are not confident enough in your ability to work with mains wiring, call in an expert to handle that part of the job for you. Mistakes with mains electricity could cost you your life.
The good news, however, is that removing an existing installation and fitting a new button and chime is no more complex than rewiring plugs. As long as you make sure the power is off when you start, the job should go smoothly and easily.
Tools needed
- Circuit tester
- Wire strippers/cutters
- Screwdriver
- Electrical tape
- Screws
- Plastic cable clips
Time required
If the wiring is already in place, installing a new doorbell takes less than an hour. If there is no wiring in place, consider bringing in an expert to handle the wiring for you, or use a wireless doorbell instead.
Step by step instructions
- Disable the electrical supply to your existing doorbell, if you have one. Test the circuit to make absolutely certain that it is receiving no power.
- Once you are certain that it is safe to do so, open the cover of the old doorbell switch, and pull the switch away from the wall, so that the wires are exposed. Use some tape to hold the wires in place while you work on connecting a new switch.
- Unscrew the cover from your new doorbell switch, and hook it up to the wires, following the instructions on the unit. The wires should be colour coded, and will match the terminals of the unit. If both wires are the same colour, this means that both wires are conductors, and either terminal will accept either wire. If in doubt, double check the documentation. Screw the wires in place securely.
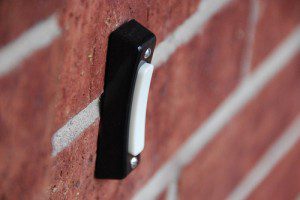
- Position the new doorbell switch on the wall and screw the plate into place securely. Slide the doorbell switch’s cover into place so that it covers the doorbell, you should hear it click once it is secure.
- If you are replacing an existing doorbell, the transformer and the doorbell should be as close together as possible, with the wire running around the edge of the door frame, held in place by plastic cable clips.
- Remove the old chime unit, following the same process you used to remove the button.
- Connect the wires to the new chime unit, passing the wires through the guide channel and screwing them into place at the appropriate terminals.
- Screw the new chimes into position and make sure that the cover is secure in place.
- Restore power to the doorbell at your breaker switch, and then push the doorbell to test that the chimes function correctly. If they do, your doorbell has been properly installed. If they do not function, disable power again and check that all of the wires are screwed into the right terminals in both the button and the chime unit. Poor connections are a common cause of malfunctions.
Impress your visitors with a stunning new front door. Shop our solid wood external doors range online and get free delivery over £750!
Troubleshooting
The most common reason for doorbells to fail to function is that the wires are screwed into the wrong terminals, or are not making proper contact with the terminals. If there is not a lot of exposed wire to insert into the terminal area, this could be a problem. Use your wire strippers to expose a few mm of extra wire, and insert that tightly into the correct terminal. Take care not to expose too much wire, because this can be a safety hazard.
A Small Safety Warning
Always disable the electrical supply before working on the doorbell, and double check that it is actually disabled before touching any wires. Do not attempt to work with mains electricity wiring yourself if you are not a trained electrician. Electricity can be incredibly dangerous. If something goes wrong, you could electrocute yourself. If you do a bad job of wiring a doorbell, you could leave yourself open to the risk of an electrical fire at a later date. Do not take that risk.
Useful Tips
Some doorbells come with a backup battery which is separate from the mains unit. Read the instructions for the doorbell to check how to wire this up. The battery should be screwed on to the wall close to the unit.
It’s important to note this applies how to wire a doorbell in the UK but should apply to the majority of doorbells.
Conclusion
Installing a single wired doorbell is a fairly simple task once you understand what each part is and where it should go. However, if you want the chime to accept more than one button (perhaps you want a ringer on multiple doors), then there will be some extra work to do.
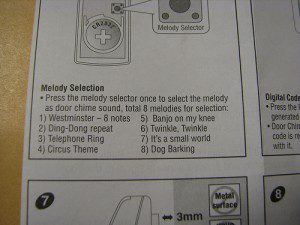
Once you have installed the doorbells and the chimes, you will need to set the chime unit so that it plays the right sound for each door. Some chime units are quite simple, and will play preset sounds for “front” and “rear”. Some units are programmable and allow you to select different songs, tones or volume levels. Take a moment to familiarize yourself with your options, and choose tones that you will be able to hear anywhere in the house.
If you live in a large home, you may want to wire in multiple chimes (for example, one upstairs and one downstairs). The chime boxes are usually quite light and easy to mount on a wall or a door frame. Take care to secure the wires out of the way so that people do not trip over them or damage them.