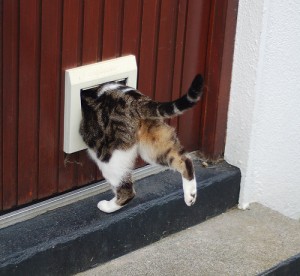
Every cat owner should invest in a catflap. Cats love to explore, and you will find that life is much easier when you don’t have to worry about the comings and goings of your feline friend at all hours of the day.
Cat flaps have been proven to improve pet mobility, and can help to improve behavioural problems too.
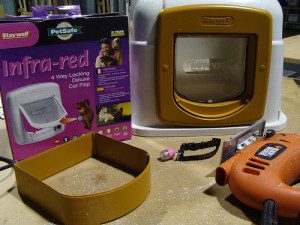
There are many different kinds of catflap on the market. This guide explains how to install a standard-sized, lockable catflap. The instructions should be similar for most kinds of cat flap, although the size or shape of the flap may differ.
Tools Needed
To install a cat flap you will need:
- Pencil
- Ruler
- Drill
- Safety goggles
- Jig saw or keyhole saw
- Set square
- A screwdriver set (most cat flaps use Phillips Head screws)
- Tape measure
- Sand paper
- Metal file
Time Required
Installing a cat flap is a fairly easy job, and should take no more than one hour.
Step by Step Instructions
Before you begin, think about where you wish to place the cat flap. In general, it is best to place the flap on the hinge-side of the door, to reduce the likelihood of a would-be intruder being able to reach through the cat flap and use a coat hanger or something similar to open the door.
Next, measure the belly height of your cat – this is the height from the ground to the underside of your cat’s belly. For most adult cats, this should be between four and six inches. Once you have that important measurement, you’re ready to begin.
1. Mark the belly height of your cat on the outside of your door. Using your ruler, raw a straight horizontal line across the door, making the line the same length as the width of the cat flap. If you have more than one cat, make sure that the flap is positioned low enough for the smallest cat to use it.
2. Using the first line as a starting point, take your set square and use it to draw a square (or rectangle, as necessary) for the outer edges of the catflap.
3. Put on your safety goggles. Drill holes in each corner of the square. Drill all the way through the door.
4. Use your jig saw to cut along the lines and remove the square from the door.
5. Carefully sand the hole to remove any rough edges.
6. Remove the blanking plugs from your cat flap.
7. Place your catflap in the door so that the lock (if your catflap has one) is positioned on the inside. Using a pencil, mark the screw holes on the door.
8. Remove the cat flap from the door again, and drill holes in the door with a 4.5mm (3/16″) drill bit.
9. Put the cat flap back into the door.
10. Check the length of the screws, if they are too long, cut them down to size and then file down the ends so there are no rough edges.
11. Screw the cat flap into place.
12. Cover the screw holes with blanking plugs for a neat finish.
Useful Tips
Cat flaps are designed to fit any depth of door. If you have an exceptionally thick door then you may need to invest in longer screws to ensure a secure fit.
You do not have to use pet doors on your front or back door. If you have a cat that only likes to play outside during the summer, consider getting a patio panel style pet door, which can be used during the summer, and replaced with a standard panel during the winter.
Pet doors can even be used on internal doors to restrict access to the room where your cat’s food and water goes. This can be beneficial for families that have several pets, especially if your dogs tend to go after the cat’s food and water.
If you have problems with your existing pet door not sealing correctly, consider investing in a pet door with a magnetic flap. These doors close automatically, and will not flap open unless they are under a lot of pressure. Other popular cat flap designs include flaps which have a four-way locking system to allow the flap to operate in several modes, including “in only”, “out only”, “in and out” and completely locked.
It is easier to install the cat flap if you keep the door open while you are working, and hold it in place by putting a door stop on either side.
Safety First
Always wear safety goggles when operating your drill, and when using a saw. Make sure that your door is held firmly in place before you start cutting or drilling, as you may hurt your fingers if the door slips while you are operating the saw or drill.
Standard sized cat flaps, if installed properly, should not affect your insurance premiums. Be aware, however that large “dog flaps” are considered a security risk by many insurance companies, because they are big enough for a small child (or an incredibly slim adult) to fit through them. If you are considering using a flap for a larger pet, consult your insurance company first, and choose the most secure kind of flap you can find.
Conclusion
Once your cat flap is installed, show your cat how to use it. Most cats take to operating a cat flap quite quickly, and will enjoy their new-found freedom.
Be aware that other small animals may be able to use your cat flap to get into your home. If you live in an area with racoons or other critters, be sure to lock your cat flap when you do not expect it to be in use. You may want to purchase a cat flap that detects your cat’s microchip and opens only when a known animal tries to use it. (or a key in their collar)